Order by 3:00 PM Monday – Friday to receive your parcel the next day.
Orders placed after 3:00 PM ship the next working day on the same 24‑Hour service and usually arrive the following day.
See Full Delivery Information.
Overview
Genuine 12V-24V dual-voltage DC pump. Same physical pump body, two operating ranges - run it at 12V for gentle flow on a battery setup, or at 24V for powerful lift on cascades and taller water features.
Dual-voltage 12V-24V DC operation - one pump, two performance bands
At 12V: up to 1000 LPH and 1m head - ideal for small fountains, tabletop features and 12V battery setups
At 24V: up to 1700 LPH and 3.1m head - suits cascades, taller water features and hydroponic lifts up to ~2.5m
Dry-run, locked-rotor and overheat protection
Adjustable flow control for fine-tuning your feature
5m cable with 2-pin DC connector
Outlet: 1/2" threaded spigot (~19mm across the thread) - connects to 12mm tubing via our Medium Attachment Pack (sold separately)
The 12-24V DC Dual-Voltage Solar Pump is a genuine dual-rated brushless DC pump. The same physical pump body runs across two voltage points - choose the one that matches the power source you're working with. Run it at 12V from a solar panel or a 12V battery for gentle flow and shorter lifts, or wire it to a 24V supply for powerful flow up to 3.1m head.
This is the same physical pump that powers our 25W solar fountain kits. Sold here as a bare pump, it gives you complete flexibility over how to power it. The manufacturer rates it for both 12V and 24V DC operation, with measurably different performance at each. Pick the column that matches your setup and plan your water feature accordingly.
At 12V - Gentle Flow
Maximum flow: 1000 LPH
Maximum head: 1.0 m
Power draw: 4.5 W
Suits: small fountains, tabletop features, 12V battery setups, low-lift hydroponics
At 24V - Powerful Lift
Maximum flow: 1700 LPH
Maximum head: 3.1 m
Power draw: 18.5 W
Suits: cascades, taller water features, hydroponic towers above 1m lift
Built to Last
Brushless DC motor - no brushes to wear out
Magnetic impeller - few moving parts
Dry-run, locked-rotor and overheat protection
2-year manufacturer warranty
Powering Your Pump
Because this is a bare pump (no panel or battery included), you choose the power side of the system. The pump accepts any clean DC supply between 12V and 24V. Below are the common power options for each operating mode.
For 12V Operation
12V lead-acid or LiFePO4 battery
10W-25W 18V nominal solar panel (output sits in the 12-18V band under load)
12V DC mains adapter (minimum 1A)
Expect 1000 LPH max at the pump outlet, dropping to zero by 1m head
For 24V Operation
24V mains-regulated DC adapter (minimum 1A)
Two 12V batteries wired in series (giving 24V)
24V battery pack with a stable output
Expect 1700 LPH max at the pump outlet, with usable flow all the way to 3m head
Important Voltage Limits
Maximum input voltage: 24V DC. Do NOT exceed this.
A nominal "24V" solar panel can produce 36V+ open-circuit - too high for direct connection. Use a buck converter or 24V battery in between.
Higher voltage = higher current draw - size cables and any fuse accordingly
Always verify the actual voltage at the pump terminals before extended running
Where It Works Well
The dual-voltage design lets one pump cover a wide range of garden and DIY water-feature applications. The flow rate and lift you'll get depend almost entirely on the voltage you supply.
Garden Ponds & Features
Small fountains - 12V operation, 1m max spray height
Pond cascades and waterfalls - 24V operation, up to 3m lift
Replacement pump for compatible 25W solar fountain kits
Durable Construction & Built-in Protections
Engineered from corrosion-resistant materials with three layers of protection electronics. Designed for outdoor use, with operating temperature -10C to +40C and a maximum submersion depth of 2.0m. The brushless DC motor has no brushes to wear out, and the magnetic impeller assembly has very few moving parts to service. Fully certified to RoHS, REACH, CE and UKCA standards, and backed by a 2-year manufacturer warranty.
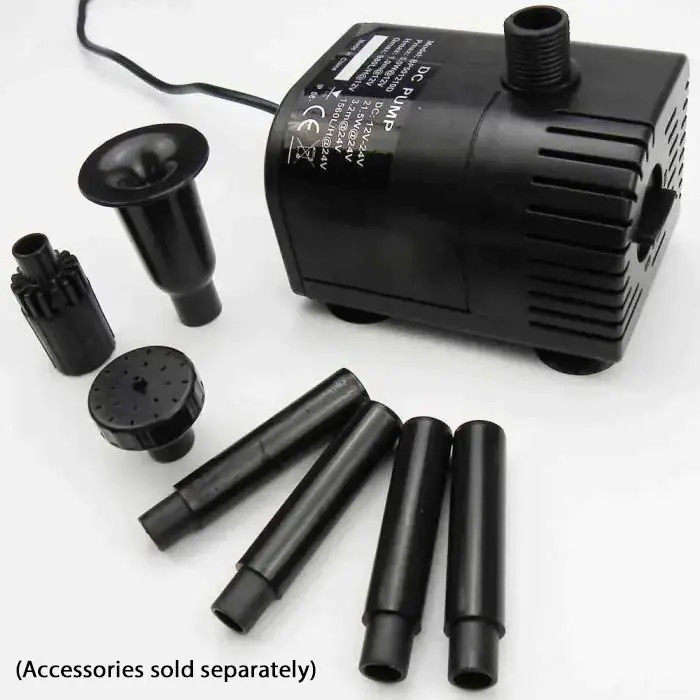
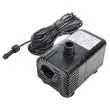
What's In The Box
Bare pump with attached 5m cable terminating in a 2-pin DC connector. The pump comes with a removable strainer/filter cage on the intake. Power source, tubing, fountain heads and any battery box are sold separately - choose the parts that match your intended setup. The pump's outlet is a 1/2" threaded spigot (~19mm across the thread); to connect standard 12mm tubing you will need our Medium Attachment Pack, which is not included and is sold separately.
The 12-24V DC Dual-Voltage Solar Pump is a genuine dual-rated unit. The same physical pump body operates across two voltage points, with different flow and head performance at each. Use the column that matches your power supply.
Specification
At 12V
At 24V
Maximum Flow Rate (Q max)
1000 LPH (264 GPH)
1700 LPH (449 GPH)
Maximum Head Height (H max)
1.0 m (3.3 ft)
3.1 m (10.2 ft)
Maximum Power Draw (P max)
4.5 W
18.5 W
General Specifications
Specification
Details
Input Voltage Range
DC 12V - 24V (dual rated)
Pump Type
Submersible brushless DC pump with magnetic impeller
Maximum Submersion Depth
2.0 m
Outlet
1/2" threaded spigot (~19mm across the thread) - accepts 12mm tubing via the Medium Attachment Pack (sold separately)
Cable Length
5 m (16.4 ft)
Connector
2-pin DC
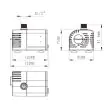
Pump Dimensions
122 x 85 x 91 mm
Pump Weight
0.41 kg
Material
Engineering plastic, corrosion-resistant
Adjustable Flow Control
Yes
Protections
Dry-run, locked-rotor, overheat
Operating Temperature
-10C to +40C
Season (solar use)
Spring / Summer (limited output in winter)
Certifications
RoHS, REACH, CE, UKCA
Warranty
2 years manufacturer warranty
Flow Rate vs Head Height
Estimated flow at each height for both operating voltages. Use these curves to size your fountain, cascade or feature for the head height you need.
Head Height
Flow at 12V
Flow at 24V
0 m
1000 LPH
1700 LPH
0.3 m
800 LPH
1500 LPH
0.5 m
620 LPH
1340 LPH
1.0 m (max @ 12V)
0 LPH
1000 LPH
1.5 m
0 LPH
800 LPH
2.0 m
0 LPH
500 LPH
2.5 m
0 LPH
250 LPH
3.1 m (max @ 24V)
0 LPH
0 LPH
Flow at intermediate heights is estimated by linear interpolation from the manufacturer label data. Actual performance varies with tubing diameter, bends, and the cleanliness of the pump intake.
Installation guide for the 12-24V DC Dual-Voltage Solar Pump. Follow these steps in order. Pay particular attention to the voltage section - this pump performs very differently depending on the voltage you supply.
Always disconnect power before handling or maintaining the pump
Do not exceed 24V DC input - this is the manufacturer's hard limit
Do not run the pump dry - keep it fully submerged when powered
Keep electrical connections dry and elevated above water level
Use IP-rated waterproof connectors for any outdoor splices
Confirm polarity before connecting - reverse polarity prevents operation
Size your cable and any fuse for the voltage you're running at
Maximum submersion depth: 2.0m
Step 1 - Decide Your Operating Voltage
Before connecting anything, decide whether you'll be running this pump at 12V or 24V. This decision drives the rest of your setup - power source choice, cable sizing, and the flow / head you can expect.
Choose 12V if you need:
A small fountain or tabletop feature (under 1m spray height)
To run from an existing 12V battery or panel
Low power draw (4.5W) for extended battery runtime
Lift of less than 1m to your feature outlet
Compatibility with your existing 12V mains adapter
Choose 24V if you need:
Pond cascade or waterfall above 1m head
Maximum flow rate (1700 LPH)
Vertical hydroponic tower lift above 1m
Full performance at heights up to 2.5-3m
Faster water circulation in a medium pond
Performance Reminder
12V max head is 1.0m - the pump physically cannot lift higher at 12V
24V max head is 3.1m
Solar panels under load usually sit between 12V and 18V - this gives performance between the two columns, closer to the 12V end
For pure 24V performance you need a stable 24V source, not a solar panel directly
See the Specifications tab for the full flow-vs-head table
Step 2 - Choose & Set Up Your Power Source
Solar Panel (12V or 12-18V band)
Use an 18V nominal panel rated 10W (minimum) to 25W (recommended)
Position facing south at approximately 45 degree tilt
Secure on a ground spike or wall mount
Output voltage at the pump usually sits in the 12-17V band depending on sunlight
Direct panel-to-pump gives variable performance through the day
Battery Setup
For 12V: any 12V lead-acid or LiFePO4 battery
For 24V: two 12V batteries wired in series, OR a 24V battery pack
Add a 5A fuse inline as a safety measure
Use a waterproof battery enclosure for outdoor installs
Consider a solar charge controller for off-grid battery recharging
Mains Adapter
For 12V: 12V DC adapter, minimum 1A output
For 24V: 24V regulated DC adapter, minimum 1A output
Choose an adapter with stable output (regulated)
House the adapter in a weatherproof enclosure
Use outdoor-rated extension cables if extending the lead
Step 3 - Install The Pump
Placement
Place pump on a flat, stable surface in water
Minimum water depth above intake: 10cm
Recommended depth: 20-30cm for best cooling
Maximum submersion depth: 2.0m
Avoid silty or debris-prone areas
Mounting & Stability
Use the supplied rubber feet to elevate slightly from sediment
Ensure pump is level
Secure to prevent movement from flow forces
Allow space around the intake for water to flow freely
Consider seasonal water-level changes
Intake Protection
Install a pre-filter if water contains leaves or fine debris
Strainer cage on the intake helps but isn't a substitute for a foam pre-filter on dirty ponds
Protect from falling leaves
Consider a wildlife-safe cage for fish ponds
Ensure easy access for cleaning
Step 4 - Connect Water Flow
For Fountains
Attach fountain head via the Medium Attachment Pack (sold separately), which screws onto the pump's 1/2" threaded outlet
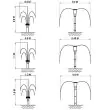
Use extension tubes to set spray height
Spray height max: 1m at 12V, 3m at 24V
Match fountain head to desired spray pattern
Balance spray height against feature aesthetics
For Water Features & Cascades
Connect 12mm flexible tubing via the Medium Attachment Pack (sold separately), which screws onto the pump's 1/2" threaded outlet
Secure with appropriate clips or hose clamps
Maximum lift: 1m at 12V, 3.1m at 24V
Minimise bends in tubing - each bend reduces flow
Use 12mm tubing throughout for best flow
For Filtration / Hydroponics
Connect to filter inlet or hydroponic distribution line with 12mm tubing
Ensure unrestricted return flow back to the reservoir
Match flow rate to filter spec or system volume
Add a flow-control valve if dialling in precisely
Confirm tubing diameter is appropriate for total head
Step 5 - Wire & Test
Wiring
The pump comes with a 5m lead terminated in a 2-pin DC connector
Confirm polarity - reverse will prevent running but won't damage immediately
Keep splice points elevated and in waterproof enclosures
Use outdoor-rated cable for any extensions
Add an inline fuse appropriate to the operating voltage
Testing
First test should be with the pump fully submerged
Confirm water output is steady and free of air
Measure voltage at the pump terminals to confirm supply
Adjust the flow restrictor if reducing output
Listen for any unusual noise - silence is normal
Common First-Run Issues
No flow: check polarity and voltage at the pump
Air burping from outlet: prime by tilting pump underwater to release trapped air
Lower flow than expected: check tubing for kinks and intake for debris
Pump stops after a few seconds: dry-run protection - check water level over the intake
Pump won't restart: disconnect power for 60 seconds and reconnect
Maintenance Schedule
Weekly
Check water level above the intake
Rinse the strainer cage if visible debris
Confirm fountain spray pattern is consistent
Check the area around the pump for leaves
Visually inspect cable connections
Monthly
Remove pump, open the intake cover and rinse impeller chamber
Check the magnetic impeller for hair, fibres or fine debris
Inspect tubing for blockages or biofilm
Tighten any hose clips that have loosened
Check battery state of charge (if applicable)
Seasonal & Winter
Inspect cable insulation each spring
Adjust solar panel angle for the season
Before frost: remove pump, drain, clean and store indoors
Battery storage: keep fully charged in a frost-free location
Don't leave the pump in standing water that could freeze
Troubleshooting
Pump Not Running
Check polarity at the pump terminals
Measure voltage at the pump - should be in 12-24V range
Inspect for impeller obstruction (open intake cover)
Check battery state of charge if battery-powered
Reset by disconnecting power for 60 seconds
Lower Flow Than Expected
First: verify actual voltage at the pump - 12V supply gives 12V performance, not 24V
Rinse intake strainer and impeller chamber
Check for kinks or biofilm in tubing
Inspect fountain head for blockage
Verify head height against the flow-vs-head table
Intermittent Operation
For solar: check for shading of the panel
For battery: check state of charge and cable joins
Look for connection corrosion at any splices
Dry-run protection triggering: confirm intake is fully submerged
Overheat protection: check water level and intake flow
Replacement & Compatibility
This pump shares its body with our 25W Solar Fountain Pump kits (SP10-501210D, SP25-501210D and SP25-501210D-F). If you're replacing a failed pump from one of those kits, this bare pump is the direct replacement - the panel, battery box or filter housing from your existing kit will reconnect to this pump's 2-pin DC connector.
This pump uses a brushless DC motor driving a magnetic impeller. The motor is genuinely rated for both 12V and 24V operation - performance scales with input voltage. Understanding how it converts DC power into water movement will help you set it up for the result you want.
DC Brushless MotorMagnetic ImpellerDual-Voltage RatedBuilt-in ProtectionsAdjustable Flow
Why It's Dual-Voltage
The motor windings are designed for a wide-range DC input. At 12V the motor turns slower and draws around 4.5W, producing 1000 LPH at zero head and lifting water to about 1m. At 24V the motor turns faster, draws 18.5W, and produces 1700 LPH with up to 3.1m of lift. The same pump body, the same impeller - just driven harder when more voltage is supplied.
This is a deliberate manufacturer choice: a single pump body covers two market segments. We sell the same chassis pre-built into both our 25W solar fountain kit (which runs the pump near 18V from the panel under load) and as this bare pump for DIY builds where you control the voltage.
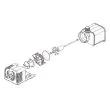
Motor & Impeller
Brushless DC Motor
No carbon brushes to wear out or replace
Longer service life than brushed pumps
Quieter operation under load
Higher efficiency across the voltage range
Electronic commutation regulates motor timing
Magnetic Impeller
Impeller is magnetically coupled to the motor
No shaft seal to wear or leak
Few moving parts - just the impeller and its housing
Easy to remove and rinse during maintenance
Resilient to short dry-run incidents
Flow Adjustment
Adjustable restrictor on the intake
Lets you reduce flow without changing voltage
Useful for fine-tuning fountain spray patterns
Saves power when full flow isn't needed
Independent of the dual-voltage performance
Built-in Protections
Dry-Run Protection
Detects loss of water around the impeller
Cuts power to the motor automatically
Resumes operation when water returns
Prevents motor burnout from running dry
Saves repair cost on accidental low-water events
Locked-Rotor Protection
Detects when the impeller is jammed (debris, leaves)
Stops the motor to prevent winding damage
Automatic reset once the obstruction clears
Reduces motor stress during start-up under load
Standard feature on this pump family
Overheat Protection
Thermal cutoff inside the motor housing
Activates if motor temperature exceeds safe limits
Usually triggers if the pump is run dry or over-voltaged
Automatic reset after the motor cools
Adds a safety margin for marginal installations
Performance vs Voltage
The key thing to understand is that the pump's headline numbers are voltage-dependent. The 12V column on the label is what you get from a 12V battery direct connection. The 24V column is what you get when you supply a stable 24V source. Solar panels under load typically sit in the 12-18V band, which lands between the two columns - usually closer to 12V performance with brief boosts in strong sunlight.
If you need precise head and flow figures for your design, measure the actual voltage at the pump terminals under load and interpolate between the 12V and 24V columns in the specification table.
Engineering Notes
The pump is built to industrial DC pump conventions: positive polarity is critical, IP68 sealed motor housing, brushless commutation electronics inside the pump body. Cable colours follow the supplier convention - check polarity before connecting to a power source, especially if extending the cable or wiring into a battery system. Reverse polarity will not damage the pump immediately but will prevent it from running.